Friday, January 21, 2011

Portrait Photography

You know, I love portrait photography. Somehow it is so different but yet so similar to landscape photography. In the end it is all about understanding the light and how it can interact with your subject. Creating a flattering portrait or just a harsh one. Everybody needs some kind of different light setup like everybody has his good and bad side.

Back home this was basically the type of photography I did. I was lacking the 'grand scenery' that I was associating with my vision of landscape photography. I shot bands and models both on location and in my little makeshift living room studio. I had my setup going with 3 strobes and a backdrop and so on. When we moved to Canada I sold everything (to my good friend Raf). Mostly because of the fact that North America works on a 110V power grid and Europe has a 220V one. Sometimes I miss it though.

Luckily we have a very decent setup at work. Sometimes they let me out of the cage so I can play with it a bit (just joking). Here's what I came up with lately.  I finally came around and uploaded some portraits to my website as well. Hope you enjoy this photography as well.


Tuesday, January 18, 2011

Creation of a Photograph

Sometimes people ask me 'Do you photoshop your pictures?'. I give them always the same answer 'Yes my photos are photoshoped, my vision often requires me to'. Heavy words, I know, but let me illustrate what I mean with the following example.


This was a shot I took over the weekend. At first I took it as a test to see where I could plant my tripod to get a simple frame of this tree, with as little distraction to the viewer as possible. Framing this shot required some stretching over barbed wire as the shot above illustrates. Framing a shot like this would have been almost impossible (I could have jumped the fence of course) without the live view function on the 5DmkII. One of the reasons I bought this camera for. It sure beats doing gymnastics to look through the viewfinder.


This was the shot as it came almost straight out of the camera. I applied some simple basic tweaks like exposure, black point, definition, saturation and vibrancy and I cropped it in a square format.


I then pulled it into Photoshop and converted it into a black and white image. As you can see, still nothing fancy. I am an Aperture user. Sometimes for black and white conversions I use Nik Silver Efex or I just use the standard Aperture black and white tool. It all depends on what shot it is or what look I am after.


I added some contrast with the curves tool keeping a close eye on the histogram of the shot. I like dramatic shots and often I tend to go over the top a little. As you notice now, the trees in the background are becoming very distracting. And the snow in the foreground is not white enough to my taste.


My solution for this was good old dodging. Look at it now. The tree is starting to stand out a lot more. I dodged the right side of the tree stem and some areas in the crown. At the end of the day I ended up with this in my layers palette.


I then saved the file in Photoshop and Aperture automatically refreshed the PSD file for me. The only thing I did then in Aperture was to apply some sharpening and adding a heavy vignette.
The final image looked like this. A very simple image that I like.

Monday, January 17, 2011

Winter

Like I said in a previous post, weather has not been very favourable for photography lately. For the last week and a half we have been put in the deep freeze. -20 something temperatures for a daytime high, but adding in the windchill you are looking at -30 something degrees Celcius. Pretty cold that is.
This weekend I was just dying to go out and shoot.

So I put on my warm clothes and headed out. I  planned on checking out a lone tree I've found in a pasture some time ago. Just to see and study how I could photograph it. I did some test shots but I quickly figured out that the flat overcast skies were not going to work their magic on this tree. I got the composition down though. Now it's a matter of waiting for the correct conditions to shoot it. The tree is about 10-15min from my place so I can react quickly when I have to. I think fog will work.

While I was driving back home though I drove by this pasture on my left hand side. The road dipped down and for a second or two I lost the horizon. The only things I saw where snow, sky and a fence to break it all up. I knew I had a cool minimalistic shot here so I slammed on the brakes. Mind you, I am a careful driver but I was on a deserted range road by myself. ;) Put the car in reverse, got out and made a dozen or so shots.

I like this composition best. Simple, symmetrical and balanced with just that little detail (animal tracks) to make you look twice. I post processing I did a simple black and white conversion. Made sure I had pure white and pure black in my shot and added a heavy heavy vignette. Just because.

Friday, January 14, 2011

Making the Pinhole Cameras pt II

I took a few days off from photography this week. The weather has been bad and is taking a turn for the worst while I write this. It is about -20 something C outside and snowing.

Last weekend I finished all the cameras. It is pretty simple DIY stuff really. I mean, looking at the pictures below should basically be self-explanatory. But here goes anyway.


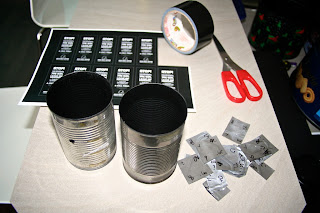
This is how the cans and tins turned out after a good nights rest. Nice and flat black. Everything in this picture is really all you need in this stage of the process. Duck Tape (I ran out so get lots of it. Did I already mention there is no such thing as to much Duck tape?), Scissors, your pinholes of course and a little message to put on the cameras, as a final touch. Sort of...


This is how I stuck the pinholes to the cans. Easy and simpel.


Once that is done cover your whole can in tape. I hope this prevents rusting these cans out. Fingers crossed on that. Make sure you at least do any seams and corners you don't trust and the top and bottoms. I also hope that this will keep water out.


Attach your message with a piece of clear tape.


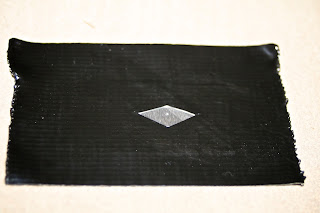
Make a shutter and stick it on the cam like this. I rolled one side of the tape up. This way it makes it easier to take the shutter off.


In the end you'll end up with a bunch of light tight boxes ready to be loaded with film. Which I did the same day. I got a bunch of old photo paper from my friend Suzanne. This was just perfect for my cheap 2011 DIY photo project. Free tins, free cans, free paper ... sweet. I converted my upstairs spare bathroom to a temporary darkroom. Locked myself in and stuck the paper in the tins under a safe light. After that was done every can got mated with their tops and I taped them shut. After that I numbered them and put them all in a big black plastic bag and put them in my garage. So they could acclimatise to the cold temperatures. In the morning they where basically frozen solid.

This week I started hanging them as well. I have a total of 6 up right now. 2 facing East and downtown Calgary. 3 Facing East, South and West on a friends pasture. And 1 facing West on 'some' pole in 'some' pasture, close to home. This weekend I'm planning to hang at least 2 more on 'some' undisclosed locations. :) But let me tell you hanging them WAS a challenge. 
I went to Canadian Tire early this week and bought a '100 piece Zip Tie set'. Just a heads up. THOSE ARE RUBBISH! One the first night I think about 50 snapped off.  They absolutely DO NOT like the cold. So back to the drawing board. I use 18 gauge mechanics wire now. This works perfectly.

Conclusion. This is a real fun project to do in the dark winter months. I think I will keep this project going until I run out of paper but that will be a while though. 
I am really excited about this project! Fingers crossed my film doesn't freeze to death first.

Saturday, January 8, 2011

Making the pinholes Camera's

Alright! Let's go to the next stage of this project.
Making the light tight boxes. Pretty straight forward project. It's DIY 101.

These are the tools I used today.
- Newspapers
- Electric Drill + Drill bit
- Metal file or Sanding paper
- Paint
- Sharpie or Pen
- Tin Boxes and Cans


First thing I did was marking out the holes on the cans. I did this with a pen. A sharpie would have been better, But it did the job. If you wish you can now use a center punch and a little tap of a hammer on that mark. This way your drill does not run away.
Look at this happy family. Nobody knows it yet but the kid is gonna get it. ;)


In the end you end up with a hole in your can. Duh. Sand the hole down on both sides. Or use your metal file to get rid of all the rough edges.


Lay all your cans and tins on the newspapers prepping them for spraying. You need to make sure, after eating all those cookies, you degreased all of them and got rid of crumbs and other stuff inside the cans.


Now you are ready for spraying. You can use whatever flat (matte) black paint you want. I chose to use chalkboard paint. It was cheap.


After your first coat let it dry for about an hour or so and give it another coat. I am leaving them overnight and tomorrow it will be part 2 of this weekend project. In the picture all the boxes look shiny but I just checked them and they are as matte as a ... euhm chalkboard?


Thursday, January 6, 2011

Making the perfect pinholes

I'm planning on doing some Solargraphy in 2011. For that I need a pinhole camera. Or to maximize my chances of actually ending up with something usable multiple pinhole cameras.
So I started to collect every single can, tin and box I could get my hands on. Round, square, long, tall, short you name it. I even have a 8 sided box, but I am unsure what to do with that.

Anyhow so yesterday I made some pinholes. 12 to be exact. These were the materials I used.
- Fine sewing needle
- Scotch tape
- Disposable pie tins
- Sanding paper (I used a Scotch Brite sponge)
- Scissors
- Magnifying glass
- Note pad
- Sharpie
- Scanner
- Patience

First thing I did was to cut up the pie tins. You want to end up with 2x3cm pieces or something small (but big enough) to handle. Then I grabbed my needle. I wound some Scotch tape around the needle to make it a little thicker so it's easier to turn when drilling the hole. Next I took the notepad and a piece of my freshly cut tin pieces. Took the needle and pressed gently with one finger (while turning it also) through the tin. I pushed the needle through from 1/5 to 1/2 the size of the point of the needle itself. Took the needle out and turned the piece around. Took the sponge and smoothed off excess metal on the back. Looked at it with the magnifying glass. Repeat this a couple of times.


But how can you measure the size of your pinholes? Well do this. Grab your scanner and put your piece of tin on the glass. Leave the top open because you want the light from the scanner to go through the hole but be sure the tin touches the glass where the pinhole is (you can always use some tape to hold it down). Put you scanner on the highest available resolution (I scanned at 12800dpi) and scan at 100%. Open this image up in Photoshop and change your unit settings to millimeters. You can either use guides to measure your pinhole or use a selection. I think guides are a little more precise. Now write down the 'gauge' of your pinhole on the tin and maybe number it as well.


That's it really. Easy. But remember, patience is the key.
Now that I have a whole selection of pinhole gauges (ranging from .11mm to .81mm) it is time to build camera's. But that is for another post.

Wednesday, January 5, 2011

Camera's and Pinholes

First a quick update on the camera situation. I can't really complain about how fast my camera got delivered. 3 days sufficed to be exactly. Which is pretty amazing if you ask me. But what I need to complain about is the fact that the seller was advertising his prices in US $ and not CAD (he was a Canadian eBay seller). So if you are a Canadian and you want stuff quickly, keep prodigital2000 in mind. But be aware of the currency fact. Ask them if they are willing to sell in CAD! This was my fault. I did not ask. I just assumed. O well lesson learned I guess. I was also a little disappointed that they did not include some sort of thank you note in the box. But the camera was really well wrapped. So that was a good thing. All in all, a neutral experience in my opinion.

On the other hand the 5DmkII is great! What a camera. First time I took it out I photographed McDougall Church about 15 minutes from Cochrane. After processing this is what came out of the 'camera'.


The size of the shots are simply HUGE compared to what I was used too. I love those custom program presets on the main dial as well. Super handy. I configured them as followed. C1 is landscape mode (lowest ISO, ƒ11, spot metering). C2 is my star and aurora mode (ISO 800, ƒ4, matrix metering, continuous shooting). C3 is when I happen to come across some action photography – like wildlife (Auto ISO, ƒ5.6. spot metering, continuous shooting, AI Servo). You never know.

When I was shooting the church a guy came up to me asking me if I was a professional photographer. Because 'he was impressed with my gear'. I assured him I was just a dedicated amateur photographer. :) But it is funny, people associated BIG camera's with professionalism.

Also things are moving forward with the pinhole project. I have all my hardware at home. Today I think I will start to make the pinholes itself. I have a bunch of old photographic paper I can use and a bunch of tin boxes. Looking forward to this project!!!