Friday, May 29, 2015

Darkroom Build: Day 12

Mudding was almost completely done yesterday. At least the first layer anyway.
It is amazing how much difference a little drywall makes. It was tough imagining this darkroom in my head but I knew the space would be pretty much perfect. I am happy that it feels like I was right. This is going to be a great lab!

Here's the hole where the head of the Durst L1200 will go. At over 8 feet tall (it is on a drop table) we had to do be a little creative with the head room. Works out perfectly though.

Here's a 180 degree pano of the wet side. Door is on the left and the wall that is on the right was behind me. Of course it looks much bigger than it is. Click it open!

No that's not toilet paper hanging there. I am also happy we found a solution for the corner.

My contractor has amazing abilities... Like walking on walls and ceilings. Spider pig, spider pig.... ;)


Thursday, May 28, 2015

Darkroom Build: Day 11

Now this is more like it!
It almost looks like a (dark)room now. 

Still a few pesky areas to figure out what to do with but overall it's coming along really really nicely. 

I was really surprised by how bright the room overall was. Might not have a safelights issue after all. ;)

The sink area is looking great. 

This is where the big Durst will go. Notice the hole in the ceiling. We had to make some room in there the allow for the head to move freely in and out. In case I need to print larger prints. 

Looking back at the water panel area. This corner is still being a PITA but my contractor is a clever dude. He will sort this out. 

Here is the area on the other side of the room almost all taped and muded (is that a word?) up. When you shut the light off, it's dark. Which is a good thing. 

Notice the hole in the ceiling here too. Damn you tall Durst enlargers! ;)

And the electrical panel boxed in. In front of it a 32" wide workbench (36" in height) still has to build. It will house my densitometer, paper cutters, spotting station and I don't know what else. Underneath the far end we are adding more drying racks too. And storage space goes underneath the rest.

Can you see it coming together? So stoked!

Wednesday, May 27, 2015

Darkroom Build: Day 10

The darkroom is coming together very well. Give it another week and we should be done. (I hope)

This is the area where the 3 enlargers will go side by side. I opted to put them each in their own little enclosure. A safelight is going to go in the far left corner (just out of the picture) and behind me. On the left their still needs to be a workbench created. The fridge (just in the picture to the left) will go underneath.

This is the same area but now looking the other way. The cables dangling down are for the white lights. The hole in the wall is obviously for a power outlet. There's one more in the little stub wall. And if you look closely there is also a hole in the ceiling (to the left) where the white light switch will go. The vent on the right will get the same filter treatment as the inlet in the outside wall as seen in a previous post.

This is the area where the big sinks go. Everything is constructed to loose a minimal amount of space, since the ceiling is so low (6' 8"), but with the ability to do 24x30" prints. Another safelight is going to go just out of the frame to the left. And I am planning on installing a digital clock in the wall where the 3 vent covers are now (hence the box there).

Tuesday, May 26, 2015

Darkroom Build: Day 8-9

A little double update this morning.

On Friday (day 8), the electrical inspector came and all was good. After that, my contractor took the window out and pulled in 50 sheets of drywall. That was pretty much it for that day. 

Yesterday, day 9, the plumbing inspector came and he too said all was well. My contractor said it took him over 2 hours to get him out the door. He (the inspector) was super interested in the darkroom project and was asking a whole bunch of questions (not related to the inspection). Maybe he was a photo buff too that was toying with the idea as well. ;)

Anyhow. After all of that, the contractor was finally able to start the dry-walling. He told me it is an incredible amount of work. Not one single sheet goes in without cutting or drilling holes in it. And there's a lot of nooks and crannies. 

It is starting to look more and more like a room though! And I'm getting more and more excited! 

Maybe dry-walling is done today and we can start thinking about finishing things up. Still some construction left to do. He needs to build another workbench and the supports for the sinks. 


Friday, May 22, 2015

Darkroom Build: Day 7

Yesterday the electrician was in again to finish up the rough in. All cables now live in their designated boxes. And the moisture barrier is back in its normal state.

Today the inspector should have came to see if he's happy with all this and the room is up to code. Should be. That's why I'm paying someone to do all this. But I just found out he was in an accident this morning and won't be in today but on monday. Ugh. I hope the accident wasn't work related. :s 

We 'might' have to install a (second) emergency door on the dry side though. Chances are the inspector might think of this area as a 'confined' space. So then it needs a door or an escape hatch at least. We will see if it comes to that. But that would mean more light seals. Something I am trying to avoid.  

Also we have start building the filter boxes for the incoming air. The 2 heater vents I have in there will get the same treatment. The boxes will use an easy-to-get automotive filter. These filters have the capability of trapping even the finest dust. Better than the 3M filter that lives in my furnace at least. 

***edit: the inspectors DID come today afterall and since everything is good we are full steam ahead! Yihaa


Thursday, May 21, 2015

Darkroom Build: Day 6

Good progress today!

My contractor finished the ventilation system today. Ventilation consists of 3, 50cfm bathroom fans that exhaust to the outside. Two fans live on the edges of the sink at a low height. And one lives in the ceiling. That way some hot air can get evacuated too. 

Coming up with an adequate cfm number for the fans is an interesting endeavour. Kodak says 15 air changes per hour. But according to the numbers on http://sebastiandarkroom.com/darkroom_design.php it's a little less.

A quick calculation tells me the darkroom is roughly upwards of 1900 cubic feet with a 250 sq ft footprint.

Doing the cfm calculation using that data using the info on the Sebastian Darkroom site tells me that I need 125cfm minimum. So 150 is more than enough. Let's hope these things aren't too loud.

We are also getting closer to hooking up the water panel. Filtration is ready to be put in. And then it's a matter of hooking up the water.

First code inspection will happen on Friday! We are inching closer.

The ventilation system in place. 

The collector and vent to the outside.

Water panel and water mains.

The water filtration with 25micron filters on both hot and cold water inlets.

An extra vent on the outside of the house in the foreground.


Wednesday, May 20, 2015

Darkroom Build: Day 5

Not much progress yesterday.

My builder, who insisted we did stainless steal sinks (I always leaned towards a wooden sink), wrestled all day to get the sinks (which are massive) somehow in the basement. 

He texted me around 4 in the afternoon that he had given up. 

"We will have to take out a window to get them in". Builders always have a way with words. "It's going to make it so much easier to get the drywall in too". 

I guess. :s

Monday, May 18, 2015

Darkroom Build: Day 4

Yesterday I got an unexpected message from my contractor that the electrician wanted to work today. It's a holiday in Canada. But since I got nothing planned anyway, he was more than welcome to pull some wires today.

And wires he pulled! Over 400 feet of wire is in the basement right now. And not all is in yet. 

You know what they say. Hope for the best, prepare for the worst. Because I know at one point. I might run out of power outlets. 

The plan is to do all LEDs for the white work lights. The switches for the eight lights will be near the ceiling and will be per side. The safelights will live on one switch (normal height) right at the entrance. 


Saturday, May 16, 2015

Darkroom Build: Day 3

Day 3 saw the rough in of the plumbing and the start of the double wall behind the sink. We roughed in 3 faucets on the main sink and one faucet on the holding sink. The water mains for the panel are in as well and the filters for the hot and cold water mains will be hanging next to the furnace outside the darkroom.

Good progress.

It is a long weekend now in Canada. Construction will continue on Tuesday.


Friday, May 15, 2015

Darkroom Build: Day 2

A little progress today; creating the double wall where the water panel goes, and creating the walls between the enlargers on the dry side. These walls will also be used as support for the bases for the enlargers that go on top. 

Tomorrow the plumber comes and we should see the start of the water mains and sinks. 


Thursday, May 14, 2015

Darkroom Build: Day 1


Not much to say other than: "I still can't believe this is actually happening!" :D
The framing is almost in. Notice also we went from a standard door to a 36" door.
Looking forward to see what today brought.

Wednesday, May 13, 2015

Darkroom Build: Intro

In the last few weeks of December I pulled the trigger on the darkroom build. I can finally say that today was the start of the 2 week (-ish) build.

I'm planning to share with you the day to day progress. But first, let me give you some background info what the plan is.

Here's the floorplan of our basement. The space I've been eying is the area in gray. The size is approximately 12x24 feet. Should be big enough. The small downside of this area are the low ceiling. But we have a work around around that. One side will be the semi-dedicated wet side (top part on the plan) and a dedicated dry side (on the bottom of the plan).


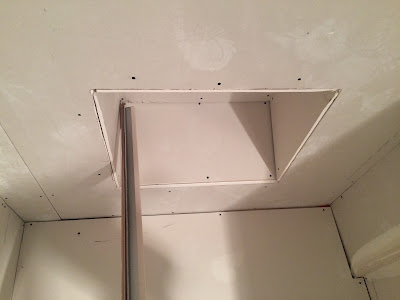
I've made a loose sketch of where I think stuff will go. As you can see the wet side will be dominated by a 10x3 foot sink (with stainless inserts), a 40x40" holding sink (stainless insert) and the massive Durst Laborator 1200 with AutoColor head that is living on a Durst drop table. We will need to reposition some duct work and make a pocket in the ceiling to make it fit but it should work. This enlarger will be my dedicated 4x5 station. 

On the other side I will have room for a long workbench. On that workbench will be a film densitometer, paper cutters, maybe a computer station, ... and it will have a dedicated spotting station with a workbench that can be angled. On the other side there will be room for 3 additional enlargers. 

I'm planning on using a Durst Colidap 1205 with CLS500 head for my 6x7 medium format work. That enlarger is also tall! So I will have to position it on a lowered table and make a pocket in the ceiling for that one too. Another 2 Durst's will live next door to this one with light baffles in between. Those two enlargers will be smaller Durst M605's, one with a colour head and the other with a b&w head. I think I will use these for the occasional 35mm shot (whenever I inherit the Leica M3 my dad has, hint hint). I'm adding baffles because it might be that on occasion, their might be more people besides me using this darkroom.


Water mixing will be done through a computerized water panel. I've chosen the Intellifaucet D250 by Hass Manufacturing. A crazy cool little unit. Just a turn of the dial will get me water temps that are spot on within ±0.1 degrees Celsius.  Of course both the hot and cold water inlets will be filtered with 10 micron filters.

All the plumbing and ventilation will live in a false wall behind the main sinks. The ventilation is kept as close to the sink as possible so in the case that harmful chemical fumes are released, I won't inhale them. The 'back-splash' behind this sink will run from the ceiling to the top of the sink and will be some kind of white mica. I want to stick wet prints on that wall to be able to analyze them.


Above you see a few rough 3D renderings of what it could look like.

- Photo 1 shows the main sink, holding sink, storage and the drying racks that live underneath the holding sink. It also shows the space where the big Durst goes.

- Photo 2 looks back at the door if you stand next to the main sink. On the right you can just make out the door of the storage closet where most of the chemicals will live.

- Photo 3 &4 show the work benches on the dry side.


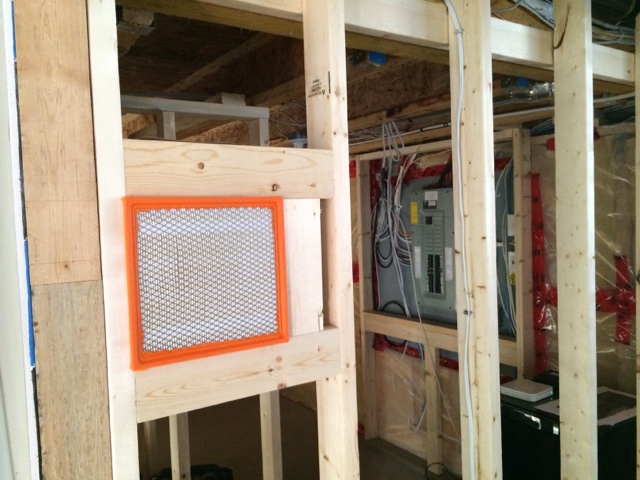
Above is a photo of the side of the basement as how it was this morning. The main sink will be right against the back wall.

And here is the dry side. Notice the one table in the foreground. That is the architect's table that will be part of the work bench. The table top can be angled to about 75 degrees.

Anyway. A lot of pondering has gone into this and I am happy that the ball is finally rolling. I can't wait to see how the framing went today. And hopefully I can update you guys tomorrow on how it looks! I am excited!!!