While shooting in Nova Scotia I almost trashed my iPhone4!
When I upgraded a few months ago from the iPhone3G to the iPhone4 I contemplated buying a heavy duty case. Since I am always out in the field and the phone is often my lifeline I needed to protect it a bit better then the previous iPhone. Mind you I don't care about this piece of gear too much. If you knew how many times I dropped my 3G int he snow you would be amazed that it worked as long as it did. But it is still a phone. A phone is a tool. I toss it around a lot.
So after some research I ended up with a company called OtherBox. I was particularly eye balling there defender series. This is – according to them – "some serious protection for serious super-users".
I'm glad I spend the dollars on this case because this is what happened.
Coming back from a morning shoot I came back to the car. I tossed the phone on the roof of the car, threw my backpack and tripod in the backseat and got in the car.
Started driving when all of the sudden I hear something falling from the roof of the car on the decklid. I look into my rearview mirror and I see something square and black flying in the air, tumbling, crashing onto the pavement and finally landing in the ditch (I was doing 70km/h).
I was like 'hmmm I wonder what THAT was?! I sure did not hit anything or drove over anything... hmmmm. Maybe I lost something from the undercarriage...'. So I decided to turn back.
It was only when I got out the car and saw the phone in the grass that I put 2 and 2 together.
I was SURE my phone was dead. But nope I was wrong. The case held up and saved the phone.
This is by far the best phone case I've owned...
http://www.otterbox.com/defender-series-cases/defender-series-cases,default,sc.html

Tuesday, August 30, 2011
Monday, August 29, 2011
Trip to Nova Scotia part 2
So I had an awesome time in Nova Scotia. What a beautiful place.
Here's a slideshow of the photos I took there. I concentrated on the rocky shores and the sea. I tried to portray a different Nova Scotia.... without the obvious touristic attractions.
Nova Scotia - Images by Olivier Du Tre
Here's a slideshow of the photos I took there. I concentrated on the rocky shores and the sea. I tried to portray a different Nova Scotia.... without the obvious touristic attractions.
Nova Scotia - Images by Olivier Du Tre
Wednesday, August 24, 2011
OK now that is weird
So before I give you all an overdose of Nova Scotia stories I'd like to write a short but very sweet blog entry.
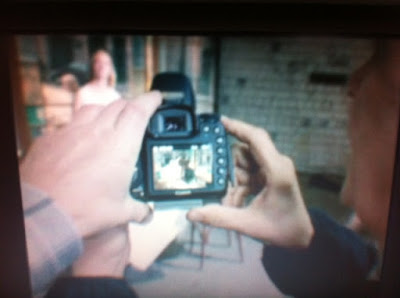
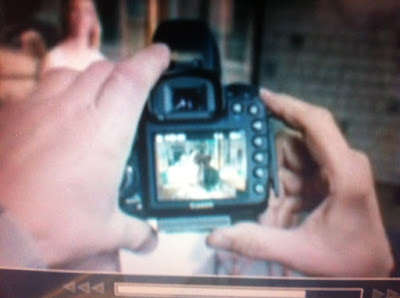
Coming home yesterday on the airplane, I was watching the 2011 movie 'Unknown' starring Liam Neeson. When all of the sudden I got a flash of a weird looking camera! The geek in me immediately took over. I paused the movie, rewound and looked at the scene again. Yes there was no mistake. My eyes had not fooled me. I was looking at the worlds first left handed Canon Camera!
Now I don't know if this was a mistake in the movie or not, or this was a one off prototype or a new camera all together. Doing some digging on the intrawebs did not result into anything concrete. But my gut feeling would be they screwed up.
So here are some screen shots I took with the iPhone. You can kind make up the 'Canon' brand name under the LCD screen so the scene was not mirrored in post...
Weird or what?


Monday, August 8, 2011
Trip to Nova Scotia
I am about to embark on a two week trip to Nova Scotia.
Me and the misses have to go to a wedding there. I consider the wedding as a minor hick up in – what is going to be – one of the best photo opportunities ever.
Our plans are to drive along the shores and do the whole tour around the peninsula. It's gonna be epic.
Since we will have very limited internet access, don't expect a lot of updates/tweets/facebook updates though. I think I am going to go through internet 3G withdrawal the moment I land. 2 weeks without the intrawebs?! How do people live over there?
Friends keep saying that life over there is so much different then life in the big city. I am very curious to see and experience that!
Also last Friday we had a HUGE aurora outbreak over Canada (and the rest of the world). If you have not seen any pictures of it by now, here's a slideshow of what I photographed.
See you in two weeks!
Aurora Borealis 5 August 2011 - Images by Olivier Du Tre
Wednesday, August 3, 2011
Star Trails How-To
I've always been interested in astronomy. Since I was a little boy. So I guess I know a fair bit about stars, planets and that sort of stuff. Anyway.
I read a lot of misleading stuff about photographing stars and doing star trails on the internet. So much that I decided to do my own how-to on how I make them. So here goes. Bare with me because this is going to be the longest post EVER!
Some background info.
Back in the days of film, doing star trails was relatively easy. You would pick a film (preferably a faster film) and with the help of a lockable cable release you would open the shutter for hours and hours. The only thing you had to worry about is film reciprocity. You would make 1 exposure for your star trails and that was it. Now this workflow does NOT work in digital any more! Contrary to what a lot of people think. It just does not work. Sensors are not like film! Let me explain.
Why one single long exposure doesn't work anymore?
The biggest reason is called amplifier glow. Ampli-WHAT?! Simple explanation. If you leave your camera 'open' for a long period of time your sensor and your camera's internals will start to heat up. That heat is – in turn – picked up by the sensor. You will start to notice hot spots in the corners first. They can turn up as magenta areas in your photo. Every camera has this. One is more sensitive then the other.
The other reason would be called light pollution. You are better off to take a lot of shorter exposures then one long exposure to do your star trials because when you do short exposure on a high ISO your sky will stay dark(er) then doing a long exposure on low ISO.
What equipment do I use?
How to set up your camera.


OK so NOW you are ready to tackle star photography! Go outside and find a dark spot. Setup your camera and start shooting. You can do single exposures or multiple exposures and create your very own star trails.
Processing your pictures.
SO you've shot 100 pictures of 30 seconds each. The first thing I do is I select one frame and do some basic tweaks. I adjust colour temperature, contrast, exposure (I often boost my exposures up to 1.5 steps), black point, a little bit of definition and so on. Then I select the whole series and apply the same tweaks to all of them (easy to do in Aperture, Lightroom or Photoshop).
At this stage – when your doing singles shots – you want to use your preferred noise reduction tool. I like Nik Dfine. But any other tool will work. Add some sharpness et voila, you have yourself a beautiful image of the night sky.
If you want to do star trails there are a couple of options. First you need to export the images to let's say high quality jpegs and put them in a folder (don't forget your dark frames!). Now you can go 3 ways.

Now you can do 2 things.

I read a lot of misleading stuff about photographing stars and doing star trails on the internet. So much that I decided to do my own how-to on how I make them. So here goes. Bare with me because this is going to be the longest post EVER!
Some background info.
Back in the days of film, doing star trails was relatively easy. You would pick a film (preferably a faster film) and with the help of a lockable cable release you would open the shutter for hours and hours. The only thing you had to worry about is film reciprocity. You would make 1 exposure for your star trails and that was it. Now this workflow does NOT work in digital any more! Contrary to what a lot of people think. It just does not work. Sensors are not like film! Let me explain.
Why one single long exposure doesn't work anymore?
The biggest reason is called amplifier glow. Ampli-WHAT?! Simple explanation. If you leave your camera 'open' for a long period of time your sensor and your camera's internals will start to heat up. That heat is – in turn – picked up by the sensor. You will start to notice hot spots in the corners first. They can turn up as magenta areas in your photo. Every camera has this. One is more sensitive then the other.
The other reason would be called light pollution. You are better off to take a lot of shorter exposures then one long exposure to do your star trials because when you do short exposure on a high ISO your sky will stay dark(er) then doing a long exposure on low ISO.
What equipment do I use?
- Canon 5DmkII. You want a camera that is good at shooting in the dark. With a good ISO range and an even better signal to noise ratio. The Canon 5DmkII is a really good camera for photographing stars. It has a big ISO range and an easy noise pattern to get rid of in noise reduction software. Another good camera would be the Nikon D3x or D3s. Both have superb low noise ratios. Of course you can shoot star trails with any DSLR you want!
- Fast lens. I use a 24-105mm ƒ4 L cause that's all I got. Anything ƒ4 and faster works perfect. Also wide angle lenses give the best result because they will simply show a bigger area of the sky.
- Tripod. I guess I don't have to explain why.
- Remote release or intervalometer. Remote releases for star trails and star photography work just fine. Intervalometers are more used if you want to do time-lapse photography during the day. It is not really necessary during night photography (I'll tell you why in a minute).
- Maybe a head lamp. But bring a RED one. It won't hurt your eyes as much in the dark and is better at NOT ruining your night vision.
- A full (warm) battery. Very important to not run out of juice.
- PATIENCE!
How to set up your camera.
- High ISO. Usually I use ISO 1600 or ISO 3200 on the 5DmkII (my standard setup is set on ISO 3200). I've even read reports of people using ISO's up to 6400 and get awesome results with the 5DmkII. I've never dared to go that high but I will try that out though.
Stars are not the most bright elements in the sky (plus they are super tiny). So it is important to use a high ISO to get as much star light registered as possible in the least amount of time. Of course we know, high ISO's bring higher noise ratios. But low ISO will give less stars. So just go with the noise. When we will start stacking all the images you will see, the noise will be a lot less then you would anticipate in the first place. - Biggest ƒ-stop available. Turn your lens wide open.
- Mirror lockup. Once your mirror is locked the only thing that needs to be tripped is the shutter. It cuts the vibrations down a little all though it is not that important in long exposure shots. But every little bit helps.
- Noise reduction. Turn it off. Just turn it off. It's useless. Why? Well you need to understand what your camera does when you put noise reduction on. When you take one image of let's say 20 seconds long. With noise reduction ON the camera immediately takes ANOTHER exposure of the same time (so 20 sec) without opening the shutter after the first shot. So basically it takes a dark frame. And subtracts that frame from your original photo. So that means you are waiting 20 extra long seconds for your camera to finish what it's doing before you can make another shot. This will give your star trails a dotted appearance. You want one continuous star trail. So you can not afford 20 second pauses. BUT at the end of your run, put the lens cap on and take a few pictures (of the same length as the shots you were doing previously). The only thing that will show up on those dark frames is system noise and hot and cold pixels. Once we start the processing you'll see that they come in handy.


Noise on the 5DmkII at ISO 3200 is easy to control (left before, right after Nik Dfine noise reduction).
100% crops.
100% crops.
- Shutter speed. Now here comes the first tricky part. We all know the earth turns on it's axis once every 24 hours. So stars move. Glad we have that down. But stars don't all 'move' at the same relative speed in the night sky. Stars close to the horizon move much faster then stars overhead or even the pole star (which hardly moves at all). So if your doing single shots your exposure time can vary a little when you're shooting close to the horizon or straight overhead. Personally I know doing 15 second shots at ISO 3200 and with my lens set at 24mm at ƒ4 will give me a good result.
You might want to try and pick a night without as much moonlight as possible. You can shoot during full moons, just be prepared to turn your exposure times down even further to avoid overexposure of the sky and foreground.
There is a simple 'formula' to calculate your longest possible exposure time (the time where stars still appear as dots and not as streaks).
The formula I use for stars overhead
600 / focal length*The formula I use for stars near the horizon
400 / focal length*
* keep your crop factor in mind though.
You want to calculate the focal length for a 35mm equivalent.


Comparison between 30 seconds overhead and 30 seconds of exposure at the horizon.
Notice the stars streaking up in the right shot. 100% crops straight out of the camera without noise reduction.
Notice the stars streaking up in the right shot. 100% crops straight out of the camera without noise reduction.
- White Balance. Another tricky subject. Make sure you DO NOT set it on auto. Cause then the WB can shift between exposures and we don't want that. I usually set it around 2500K – 3500K. Your trying to outbalance any stray man made light that could shine into your sky. In heavily light polluted areas you can still do star trails!
- Autofocus OFF! And IS too. Just put your lens manually on infinity. I've read a lot of reports that lenses can focus 'past infinity' but after some testing I concluded that for my setup, right on the infinity mark works best. You want your stars to be as sharp as pin pricks. Blobs are not as nice.
- Set your camera to make continuos exposures. This way by locking your remote you take a perfect 20 second star picture EVERY 20 seconds.
OK so NOW you are ready to tackle star photography! Go outside and find a dark spot. Setup your camera and start shooting. You can do single exposures or multiple exposures and create your very own star trails.
Processing your pictures.
SO you've shot 100 pictures of 30 seconds each. The first thing I do is I select one frame and do some basic tweaks. I adjust colour temperature, contrast, exposure (I often boost my exposures up to 1.5 steps), black point, a little bit of definition and so on. Then I select the whole series and apply the same tweaks to all of them (easy to do in Aperture, Lightroom or Photoshop).
At this stage – when your doing singles shots – you want to use your preferred noise reduction tool. I like Nik Dfine. But any other tool will work. Add some sharpness et voila, you have yourself a beautiful image of the night sky.
If you want to do star trails there are a couple of options. First you need to export the images to let's say high quality jpegs and put them in a folder (don't forget your dark frames!). Now you can go 3 ways.
- If you're on a MAC platform you can download the free StarStaX program by Markus Enzweiler. You can find it here. This program basically does the same as Startrails (for PC), which you can find here. It combines all your shots into one picture. You can subtract your dark frames and it's all pretty easy and intuitive.
- You can use a batch process in Photoshop and apply an action to combine them all. You can download that action here. At the end make a new layer and copy your dark frame in it. Set the blending mode to subtract. And go from there.
- Or you can do it manually (it's a lot of work) but here is why. The blending mode that is being used by the programs above is the equivalent of the 'Lighten' mode in Photoshop. What that mode does is it shows only the lightest pixels of each frame thus creating the star trails. But one of the characteristics of this mode is that it creates gaps in the star trails. The gaps are NOT there. It is just a side effect from the blending mode.

Combination of shots using with StarTraX. Notice the gaps in the star trails.
- Either clone out the billions of gaps. Good luck with that! (that was a joke).
- Or use a combination of the 2 blending modes 'lighten' and 'screen'. Do the following. Load your files into a stack by using file>scripts>load files into stack. Don't convert them into a smart object cause that would beat the purpose. Now you are going to a very boring task. You are going to duplicate a bunch of layers and alternating the screen and lighten modes to blend the layers together.
This is what you do. Turn all the layers off except for the bottom 2. Now set your second layer to blend mode 'screen' and merge layer 1 and 2 together. Set this new layer to ‘lighten’ mode. Now do the same for each pair of layers. Set your third layer to blend mode 'screen', and merge it with the copy of the second layer, then set that new layer to 'lighten'. And repeat. It is a boring task. But once you get the hang of it you'll see it's quite fast.

And the above Photoshop blending mode trick in the shot above produces NO MORE GAPS. Yes the two shots are different because I was lazy and only combined 20 frames in the image above just the illustrate the result.
All you need to do is apply some curves on the above stack and save your image. OR you could have taken every image and turned the exposure down just a fraction. The above technique basically adds exposure (thanks to the screen mode) to the image. So if you take it down 1 step. Combine 2 images that are 1 step underexposed, will produce a normally exposed frame.
Confused?! Don't be. It's pretty easy.
If you want to read up on this trick I would suggest to read a good how to on NaturePhotographers.net. Click here to read it.
Shooting Auroras
If you are lucky enough to live in a place where you can see the auroras and you want to photograph them (like me) you can use the single exposure technique. For my shots I use a predefined setting on my camera. I start with exposures of 15 sec. When the aurora spark up I often go to as low as 6 seconds. I am not changing the ISO. Because if the auroras are fast moving, I want to record as much detail as possible thus I use a short exposure time. It's not rocket science. Just a little bit of logic that's all.
I hope this 'tutorial' is helpful to some of you. If you have ANY questions please do ask. I will answer them in the comments below.
Thanks for reading and now go out and shoot some stars! And please do share! I love looking at night sky pictures.
Tuesday, August 2, 2011
What a busy weekend
Long weekends. You gotta love them.
Last Friday Paul Zizka, the whole Caffeine and Cameras group and I, went to Bow Lake to photograph us some star trails.
Long story short. I was home at 5am. ;) Wonderful night. As if the night couldn't be any better, on the drive home I saw beautiful patches of thick heavy fog. I didn't stop I just enjoyed the views I was getting.


For those who are interested in doing some star trails. I am planning on doing a how to very soon. Hang in there. :)
Then on Saturday (just as I was making plans to sleep in) I got a heads up on some possible aurora activity. So I went out again. Every time I see the Northern Lights, they are so different. This time around the colours were the weirdest I've seen so far. From pinks and purples to light teals(!) and deep greens. AWESOME!!!
Aurora Borealis 30 July 2011 - Images by Olivier Du Tre
Also one of the images got featured on the official Nasa '3D Sun' iPhone app. All though – thanks to my quirky accent in my last name – my name showed up weird. But I'll take it.


And then on Sunday I simply had to cross the street and shoot the fields in front of my house. We were getting some awesome clouds. I couldn't miss that!

And yesterday (the statutory holiday) I DID NOTHING! ;)
Last Friday Paul Zizka, the whole Caffeine and Cameras group and I, went to Bow Lake to photograph us some star trails.
Long story short. I was home at 5am. ;) Wonderful night. As if the night couldn't be any better, on the drive home I saw beautiful patches of thick heavy fog. I didn't stop I just enjoyed the views I was getting.


For those who are interested in doing some star trails. I am planning on doing a how to very soon. Hang in there. :)
Then on Saturday (just as I was making plans to sleep in) I got a heads up on some possible aurora activity. So I went out again. Every time I see the Northern Lights, they are so different. This time around the colours were the weirdest I've seen so far. From pinks and purples to light teals(!) and deep greens. AWESOME!!!
Aurora Borealis 30 July 2011 - Images by Olivier Du Tre
Also one of the images got featured on the official Nasa '3D Sun' iPhone app. All though – thanks to my quirky accent in my last name – my name showed up weird. But I'll take it.


And then on Sunday I simply had to cross the street and shoot the fields in front of my house. We were getting some awesome clouds. I couldn't miss that!
And yesterday (the statutory holiday) I DID NOTHING! ;)
Subscribe to:
Posts (Atom)